Content personalization has become a key marketing strategy for engaging customers. By tailoring content to individual preferences and needs, companies can significantly increase audience engagement, support lead generation, close transactions, and retain customers.
HubSpot, a leading customer relationship management (CRM) platform, supports personalization and offers a robust set of features to help achieve it. In this article, I will explain how you can use personalization tokens and smart content rules in HubSpot to create more effective and engaging experiences for your contacts.
How do personalization tokens work?
Personalization tokens in HubSpot enable the display of personalized content based on data stored in the CRM. Whether you're creating web pages, landing pages, or email campaigns, personalization tokens allow for the dynamic insertion of recipient-specific information. By utilizing default contact properties or custom properties you have defined, you can create customized experiences for each user.
Adding personalization to content
To start personalizing content using tokens, navigate to the content you want to personalize. You can do this as follows:
- Website pages: In your HubSpot account, go to Marketing > Website > Website Pages.
- Landing pages: In your HubSpot account, go to Marketing > Landing Pages.
- Email: In your HubSpot account, go to Marketing > Email.
Find the content you want to edit or create new content by selecting the appropriate option.
In the editor, click on the "rich text module" to insert a personalization token. Place the cursor where you want to insert the token, then click the "Personalize" button on the rich text toolbar. Click the "Token" dropdown menu and search for the desired token type based on the specific data object. Select the appropriate data field from the dropdown menu to use that information as the token.
Also, set a default token value to be used when a contact does not have any value in the selected data field. HubSpot can use the entered default value globally or for a specific personalization. If this field is left blank and the contact does not have the relevant data collected yet, HubSpot will skip displaying the personalization.
In the final step, click "Insert token" to add the token to the content.

Previewing personalization
You can preview personalization on landing pages and website pages. To do this, click "Preview" in the top right corner of the editor. You can also preview the page for a specific contact by selecting them from the dropdown menu.
To preview an email message, click the "Actions" dropdown menu and select "Preview." Similar to the page preview, you can preview the email message for a specific contact by choosing the contact from the dropdown menu.
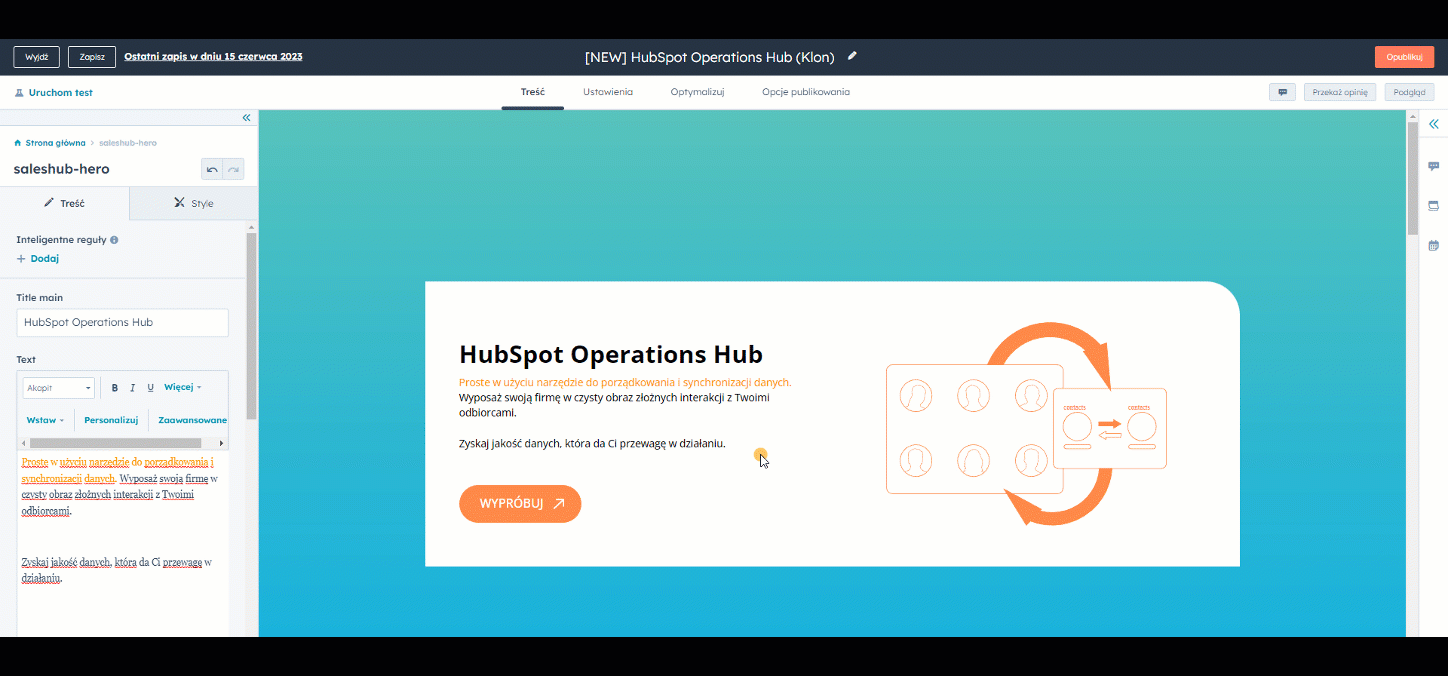
Adding smart content rules
In addition to personalization tokens, HubSpot offers the ability to apply smart content rules. These rules allow for displaying different versions of content blocks based on specific user criteria. Smart content modules can be used in email messages, blog posts, templates, and website pages. With smart rules, you can create personalized experiences for different audience segments.
Categories of smart content rules
Smart rules can customize content for a user based on the following categories:
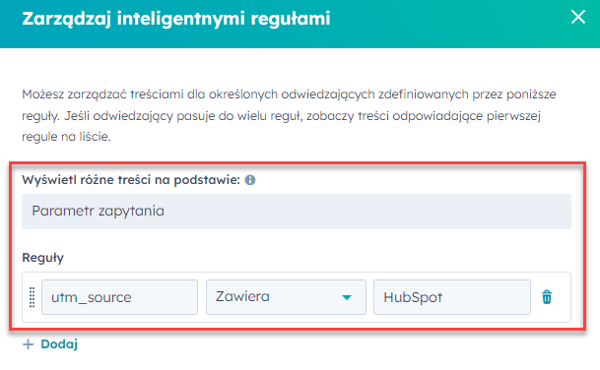
- Ad source: Display content based on the clicked ad identified by UTM parameters in the page URL.
- Country: Display content based on the user's country determined by their IP address.
- Device type: Display content based on the device being used, such as a mobile phone, tablet, or desktop computer.
- Referral source: Display content based on how the visitor found your website.
- Preferred language: personalize your content based on the language set in the visitor's web browser.
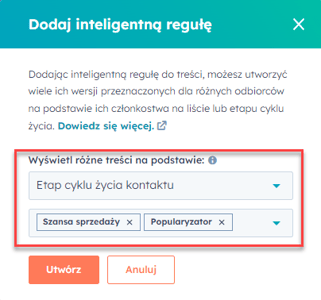
- Contact list membership: Display different content to visitors who are members of different HubSpot lists.
- Lifecycle stage: Display different content based on the visitor's "lifecycle stage" property value.
- Query parameter: Display content based on query parameters in the visitor's page URL.
Adding smart content to marketing email messages
Subscribers of Marketing Hub Professional and Enterprise can add smart rules to the subject line and modules within email messages.
To add a smart subject line:
- Go to "Marketing" > "Email" in your HubSpot account.
- Hover over the email message and click "Edit" or create a new email message.
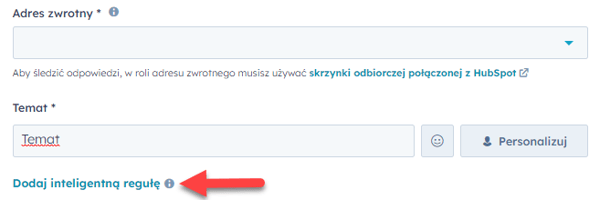
- Go to the "Settings" tab and click "Add smart rule" in the "Subject" section.
- Configure the smart rule based on the desired category and criteria.
The categories you can use when adding a rule to the email subject line are:
- Contact list membership
- Lifecycle stage
Adding smart content rules to blog posts or website pages
To add a smart rule to a content module within a blog post or website page:
- Hover over the module, click the "More" dropdown menu, and select "Add smart rule."
- Choose the smart rule category and configure it accordingly.
Once the rule is created, a new field will appear, allowing you to enter the text to be applied if the contact meets the rule's criteria. From this point, you can also add, remove, or modify rules.
By leveraging personalization tokens and smart content rules in HubSpot, you can create content that better aligns with the needs of your audience, target specific audience groups, or individual visitor parameters on your site. Delivering personalized experiences based on unique properties, locations, and behaviors of visitors helps drive greater engagement and achieve better results. Start using personalization and smart content in HubSpot today to unleash the full potential of your marketing strategies.